


Items you will need
Straight pins
Man's Tie
Scissors
3/8 elastic
matching thread
sewing machine
needle
3/8 triglides and side release buckles (optional)
First measure your little man from the collar bone to where the belt buckle would rest. Double that measurement plus one inch and you have the length of your tie.
Guide: Newborn- 7 inches (15 inches altogether)
Infants- 8 inches (17 inches altogether)
6-18 months- 9 inches (19 inches altogether)
24 months- 10 inches (21 inches altogether)
2T-4T- 11 inches (23 inches altogether)
Use another boys tie, or Pattern (I've included newborn, infant, and toddler sizes) to lay down on the tie you plan to alter into a boys tie. Find where the pattern perfectly fits width wise on the tie you bought. Measure out the length you need from that point to the skinny end of the tie.
*if making an infant tie, you can use the skinny end of the man's tie as one end... in other words you will only have to alter one end*

I mark what will be my tie ends with a straight pin. Then cut on a diagonal a couple of inches up from the straight pin. Do this with both the large and short end.

Your tie will look like this...

Pull back the fabric so that you can trace your tie pattern onto the inside fabric.


Now fold down the point so that right sides are together and you have the raw edges lined up against each other


Carefully (so not to snag the material) pin in place

Sew a straight stitch on the raw edge side- using the tie point you made as a guide for your sewing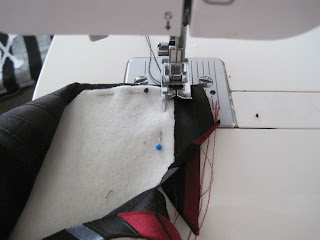


turn right side out, and push the point out with your finger or pencil

Now the fun part :)
Work with the tie to shape it into looking like an actually tie. This takes a little practice and time, since the material was originally pressed to lay straight, not fold in and such. But it will adventually fold how you want.
I usually trim some of the extra material off, tuck in the rest and then fold one side, pin. Then fold the other side and pin and press. Always check the front of the tie to make sure it looks right!


I prefer to use straight pins as little as possible to keep from snaging the material, so I make sure to press extremely well. Then using a Blind stitch, hand sew back together.

Remember the measurement you took for length of the tie? Whatever you decided you wanted the tie length to be when worn add 1 1/2 inches to that in the front. For example: If I am making an 11 inch tie, I have a tie that is 23 inches in length, I then fold it to where the front of the tie measures 12 1/2 inches.
Go down one inch from the fold of the tie, and on the left side (front of tie facing you) so the two sides together


Elastic time! Using triglads and buckles is totally optional. I've seen ties with just the elastic used, so you slip it over the childs head. I've also seen ties with snaps attached to the elastic. I chose this way...
Mind you from here on out, the pictures will do most of the explaining..
Measure the childs neck and add about 5 or so extra inches (this part isn't down to a science)

Fold one end of elastic through one side of the buckle and hand sew. 

Loop through the triglide

Loop through the other end of the buckle

And back through the bottom of the triglide to make the adjustable loop part (a little tricky). Fold elastic back over bottom part of triglide and hand sew the end onto the elastic. 


Now for the last part! Wahoo!

Put the elastic below the stitch, inbetween the to ends of the tie

(Stick with me here...)
With tie facing you, pull the back end of the tie (skinny half) towards you and up. Now pull it through the hole above the stitch (pulling to the left, shown in picture below)

Keep pulling it down, while pulling the elastic up so it starts to look take on the 'triangle' shape of a tie

Now you should have the front (large) half of the tie hanging out on the right. Take this piece and pull it under and up through the elastic loop.

Now tuck it down into the front of the triangle and pull through.


No comments:
Post a Comment